Tip # 5 Fixing oxygen sensor codes
For older vehicles with oxygen sensor, this is use primarily to monitor the quality of the engine fuel mixture. It is done by checking the percentage of oxygen compared to the fuel when the mixture comes out of the exhaust. This is why they are placed in the exhaust manifolds where the combustion gas is passing.
If you get an oxygen sensor code, you can test it by measuring the voltage of the wire going to the sensor. It should be taken after the engine has warmed up (say about 20 minutes after starting) and the voltage reading in the wire should be fluctuating. Depending on the engine type, the reading should oscillate between a lower voltage and a higher voltage example: between 0.2 volt to 0.8 volt. Any reading showing the voltage stuck at low or high voltage indicates a problem.
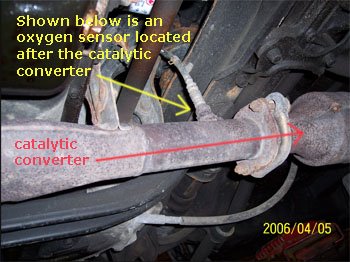
Fixing check engine light with oxygen sensor codes should be a breeze if you this simple principle. Shown below is an example of an oxygen sensor.

You can actually simulates an oxygen sensor problem by making the engine deliberately rich by spraying fuel in the intake (like carb cleaner) and you should see the reading staying at a high voltage. The same thing happens if you deliberately make a vacuum leak by opening a vacuum hose which will make the mixture lean and the sensor showing a constant low voltage reading. On newer models coming out lately, 2 oxygen sensors are used: one for the engine and a second one located after the catalytic converter (CAT). The last one is use to monitor the CAT performance which we will discuss later.
If you get an oxygen sensor code, you can test it by measuring the voltage of the wire going to the sensor. It should be taken after the engine has warmed up (say about 20 minutes after starting) and the voltage reading in the wire should be fluctuating. Depending on the engine type, the reading should oscillate between a lower voltage and a higher voltage example: between 0.2 volt to 0.8 volt. Any reading showing the voltage stuck at low or high voltage indicates a problem.
Fixing check engine light with oxygen sensor codes should be a breeze if you this simple principle. Shown below is an example of an oxygen sensor.
You can actually simulates an oxygen sensor problem by making the engine deliberately rich by spraying fuel in the intake (like carb cleaner) and you should see the reading staying at a high voltage. The same thing happens if you deliberately make a vacuum leak by opening a vacuum hose which will make the mixture lean and the sensor showing a constant low voltage reading. On newer models coming out lately, 2 oxygen sensors are used: one for the engine and a second one located after the catalytic converter (CAT). The last one is use to monitor the CAT performance which we will discuss later.
posted by Rich at 9:19 AM
![]()
![]()

0 Comments:
Post a Comment
<< Home