Sunday, April 30, 2006

Tip # 11 No check engine light but vehicle keeps stalling at stops

If you are experiencing stalling at stops but don’t see any check engine light in your dash panel, check your fuel regulator connected in the fuel rail on top of your engine. This regulator controls the fuel pressure of your fuel by disconnecting the vacuum hose hooked to it. When disconnected, it should raise the fuel pressure and lower it as soon as you install the vacuum hose back.

To test your fuel regulator, start your engine and warm it up to say 15-20 minutes. Then when idling, remove the vacuum hose connected to it. If you see a spit of fuel coming out of the fuel regulator or end of the hose, it shows the fuel regulator rubber diaphragm is damaged and should be replaced. When damaged, the end of the vacuum hose will also smell gas.

Other symptoms of a bad fuel regulator are:

Long hard starts especially if the engine is flooded if the diaphragm is ruptured.
Black smoke at your tail pipe after you got it started.


Shown here is an example of a fuel regulator.

Note the fuel rail also connects to your fuel injectors. When testing fuel pressure, use a fuel gage hook up to the schrader valve of the fuel rail. (This valve is similar to the air valve for inflating air in your tires).

Wednesday, April 26, 2006

Jaguar vehicles obd1 code retrieval

For Jaguar vehicles with obd1 codes (made before 1995 or 1993), testing the check engine lights in your dash to get the code is simple. All you do is locate the Vehicle Condition Monitor (VCM) button in the dash panel sitting below the tachometer and speedometer. The procedure begins by turning the key off and waiting for 5 seconds then turning the ignition key to position 2 without starting the engine. When you press the VCM button, codes will start to display in your dash panel.

Clearing the codes can be done by turning the key off and removing the battery negative terminal for 30 seconds and reconnect.

Here are some popular obd1 Jaguar codes:

Code 12 Mass sensor fault
Code 13 Manifold absolute pressure (MAP) sensor fault
Code 14 Engine coolant temperature sensor fault
Code 16 Air temperature sensor fault
Code 17 Throttle positioner sensor fault
Code 18 and Code 19 Throttle potentiometer/Mass sensor airflow sensor fault
Code 22 and Code 44 Heated oxygen sensor/ Fuel pump relay fault
Code 23 Fuel control system fault
Code 24 Ignition amplifier circuit fault
Code 26 Air leak or vacuum leak causing lean condition
Code 29 Electronic control module fault
Code 33 and Code 34 Fuel injection circuit fault
Code 37 EGR solenoid valve fault
Code 39 EGR system fault
Code 46 and Code 48 Idle air control valve circuit fault
Code 68 Vehicle speed sensor fault
Code 69 Park/Neutral position switch circuit fault
Code 89 Evaporative canister purge control valve circuit fault

Note:

Ignition key position 2 can be verified using your Jaguar service manual. For all other questions, please contact ATS (if you are a member) or the Jaguar dealership.

Tuesday, April 25, 2006

Tip# 10 Testing check engine lights with Ford fuel circuit

When you get either code 95 or code 96 on Ford vehicles made before 1995, these codes usually imply secondary fuel circuit failures. However, testing these codes are usually easy if you know how to use this trick described below.

First find out the location of your ford diagnostic connector. This is commonly located inside the engine compartment mostly near the battery sitting close to the fender. Using the connector, you can actually test your fuel pump if it is working or not. As you will probably know right now, the fuel pump circuit consists of eec power relay that supplies power to the whole circuit; followed by fuel relay activated by your computer; inertial switch and finally the fuel pump located inside the fuel tank.

If you suspect the fuel pump circuit is defective as shown by these codes, you can check the fuel pump by putting a jumper wire connected to the vehicle’s ground or negative battery post and connect it to the fuel pump test lead pin connector. Using this jumper wire, the fuel pump is activated right away which you can verify by the humming sound which you can hear by fuel tank filler tube. Once confirmed, it is just a matter of checking the rest of the components and test if they are good or not.


Shown here is a picture of the diagnostic connector and the location of the fuel pump test lead pin.

During the test, you need to turn the ignition key on to complete this test.

Sunday, April 23, 2006

BMW vehicles obd1 codes retrieval

You can get the check engine light codes of BMW vehicles for models made before 1995 using the check engine light. All you need to are:

Turn ignition key to run with engine not running
Depress gas pedal 5 times in wide open throttle (WOT) position within 5 seconds
Read the flash codes in the dash using the code table below.

Flash Code Table:

Code 1211 MCU malfunction
Code 1215 Air mass flow sensor fault
Code 1221 Oxygen sensor
Code 1222 Oxygen sensor control
Code 1223 Engine coolant temperature
Code 1224 Air intake temperature
Code 1231 Battery voltage
Code 1232 Idle throttle valve switch
Code 1233 Full load throttle valve switch
Code 1251 and Code 1252 Injection valve
Code 1261 Fuel pump relay
Code 1262 Idle speed control valve
Code 1263 Fuel tank vent valve
Code 1264 Oxygen sensor heater relay
Code 1444 No failure

Notes:

Please get hold of BMW service manual to use the above table. Also, BMW codes can also come in single, double and triple digits. The codes can be reset by disconnecting the negative battery cable and reconnect.

Saturday, April 22, 2006

Subaru vehicles 1987-94 obd1 codes retrieval

Subaru code retrieval is done by accessing two things: diagnostic connectors located near the kick panel by the driver side and watching the codes being flashed by a lens light at the computer box located under the dash by the driver side.

There are 2 ways to get the codes: using the read memory mode which will give codes that have shown in the past but has not shown at present. This is done by connecting the read memory connector and disconnecting the test mode connector with ignition key on, engine off. To get the codes actively present, you need to access the D-check mode by disconnecting the read memory connector and connecting the test mode connector, also with ignition key on, engine off.

To clear the codes, both read memory and test mode connectors must be connected and with engine running. Make sure all codes showing at D-check mode is fixed or the codes will not clear.

Here are some popular Subaru obd1 codes 1987-94:

Code 11 Crank angle sensor fault
Code 12 Starter switch fault
Code 13 TDC sensor fault
Code 14 Injector no.1 fault
Code 15 Injector no.2 fault
Code 16 Injector no.3 fault
Code 21 Coolant temperature sensor fault
Code 23 Pressure sensor fault
Code 24 ISC solenoid valve fault
Code 26 Air temperature sensor fault
Code 32 Oxygen sensor fault
Code 33 Vehicle speed sensor fault
Code 35 Purge control solenoid fault
Code 36 Ignition circuit fault
Code 41 Air/fuel ratio control system fault
Code 42 Idle switch fault
Code 43 Throttle switch fault
Code 45 Atmospheric pressure sensor fault
Code 52 Clutch switch circuit fault
Code 62 Electric load signal fault
Code 63 Blower fan switch fault
Code 65 Vacuum pressure sensor fault

NOTES:

To read the codes being flashed by the lens light, use this example: code 24 is 2 long flashes followed by 4 short flashes. A 2 seconds pause separates any additional codes.

Always check your service manual if you have any problem accessing and fixing the codes or contact http://www.automotivetroubleshootingsecrets.com.

Friday, April 21, 2006

Suzuki vehicles 1986-1995 obd1 codes retrieval

To get the check engine light codes of Suzuki vehicles is fairly easy. All you need is to access the fuse panel under the dash on the driver’s side. On the lower left corner of the fuse panel, there is a fuse holder or diagnostic connector that you have to install a fuse. Once you do that and after you turn the key on, the dash panel will start flashing the codes.

To clear the codes, turn the key off and remove the fuse. Then disconnect the battery negative terminal for 30 seconds and reconnect. (On some models, the duration of disconnection is up to 60 seconds, check your manual or contact ATS).

To read the codes being flashed, use this as a guide: code 13 is one long flash followed by 3 short flashes. Each code is repeated 3 times before going to the next code after a pause.

Here are some popular Suzuki codes for 1986-95 vehicles:

Code 12 System normal
Code 13 Oxygen sensor fault
Code 14 Engine coolant temperature circuit fault, high voltage
Code 15 Engine coolant temperature circuit fault, low voltage
Code 21 Throttle position sensor (TPS) circuit fault, voltage high
Code 22 Throttle position sensor (TPS) circuit fault, voltage low
Code 23 Air temperature sensor circuit fault, voltage high
Code 24 Vehicle speed sensor circuit fault
Code 25 Air temperature sensor circuit fault, voltage low
Code 31 Pressure sensor circuit fault, voltage high
Code 32 Pressure sensor circuit fault, voltage low
Code 33 Mass air flow sensor circuit fault, voltage high
Code 34 Mass air flow sensor circuit fault, voltage low
Code 41 Ignition signal fault
Code 42 Crank angle sensor circuit fault
Code 44 Idle switch of TPS, open circuit
Code 45 Idle switch of TPS, shorted circuit
Code 51 EGR system circuit fault
Code 52 Injector fault
Code 53 Ground circuit fault
Code 54 Fifth gear switch circuit fault
Code 71 Test switch circuit

Thursday, April 20, 2006

Mitsubishi vehicles 1984-1994 obd1 codes retrieval

Getting the check engine light codes for Mitsubishi vehicles requires using an analog voltmeter (this voltmeter has needle to read the voltage). To read the code, shut engine off and connect the voltmeter leads to the diagnostic output connector located under the dash panel in the driver’s side by the kick panel.

The diagnostic output connector has 12 terminal pins but connect the positive lead of the voltmeter to the top right corner terminal called MPI diagnosis (pin 1) and the negative lead of the voltmeter to the lower left corner terminal called ground terminal (pin 12). Once connected, turn the key on without starting and watch the dash panel flash the codes. To read the codes, use this guide:

Code 12 is one long sweep of the needle followed by 2 short sweeps. If there are more codes, there is a 2 seconds pause between codes. Most models before 1988 use a single digit codes but after that, it is mostly a 2 digit codes. To clear the codes after removing the voltmeter, remove the battery negative terminal for 15 seconds.

Here are some common Mitsubishi vehicle codes for 1989-94 models:

Code 11 Oxygen sensor fault
Code 12 Air flow sensor fault
Code 13 Intake temperature sensor
Code 14 Throttle positioner sensor fault
Code 15 SC Motor position sensor fault
Code 21 Engine coolant temperature sensor
Code 22 Crank angle sensor fault
Code 23 No.1 cylinder TDC sensor fault
Code 24 Vehicle speed sensor
Code 25 Barometric pressure sensor
Code 31 Knock sensor fault
Code 32 Manifold pressure sensor
Code 36 Ignition timing adjustment signal
Code 39 Oxygen sensor fault
Code 41 Injector fault
Code 42 Fuel pump fault
Code 43 EGR fault
Code 44 Ignition coil on 3.0L engines (1 and 2 cylinders)
Code 52 Ignition coil on 3.0L engines (2 and 5 cylinders)
Code 53 Ignition coil on 3.0L engines (3 and 6 cylinders)
Code 55 AV valve position sensor
Code 59 Heated oxygen sensor
Code 61 Transaxle control unit cable for automatic trany
Code 62 Warm-up control valve position sensor

Wednesday, April 19, 2006

Tip #9 Quick fix for transaxle converter clutch (tcc) codes for GM cars

This is for GM car owners: do you have frequent stalling at stops signs especially after exiting at a freeway? After stalling, it starts right away but stalls again when you put the trany in drive. When you have these symptoms, chances are your tcc circuit might be defective causing your torque converter to be lock up. When this happens, your trany is stuck in high gear and instead of shifting down at stops, the high gear is still engaged causing it to stall. (Imagine approaching an intersection and you are still in 4th or 5th gear instead of 1st).

What do you do if you suspect the tcc circuit is bad? For GM cars, mechanics routinely disconnect the tcc plug-in at the trany and if the symptom stops, the tcc solenoid is usually the culprit. Remember: tcc sensor code may or may not show up in your dash when this happens.

Tip:

The solenoid can be replaced by buying a solenoid kit from any trany shop usually for under $30 which is cheap when you compare how much trany garage charges. The solenoid itself is replaced when the valve body cover is removed. On most GM cars, this job can be done without removing the trany. Make sure to reset the computer after replacing the tcc solenoid or ask http://www.automotivetroubleshootingsecrets.com if you need assistance like identifying the tcc wires or location.

Tuesday, April 18, 2006

Isuzu vehicles 1985-1994 obd1 codes retrieval

You can get the check engine light codes yourself on 1985-94 Isuzu vehicles by using a jumper wire between terminal pins 1 and 3 or A and B in the diagnostic connector. This diagnostic connector can be located anywhere from the driver side kick panel, passenger kick panel and sometimes at the center console. When using A and B terminal pins, getting the codes is similar to GM vehicles. Once the jumper wire is connected, turn your key on and read the codes being flashed in the dash panel.

Reading the lights being flashed is simple, like code 12 is a long flash, a pause followed by 2 short flashes. Code 12 is also the first code to appear which verifies that the diagnostic system is working. If there are any codes that are present, it will be flashed in the same way with each codes being flashed 3 times before going to a next higher code.

Clearing the codes is done mostly by removing the battery negative terminal but removing the ecm (computer) fuse for 10 seconds is the best method. This way, you don’t need to re-program your radio or clock in case you use the battery connection.
Don't forget to remove the jumper wire with key off before clearing the codes.

Here are some popular obd1 codes for 1985-94 Isuzu vehicles:

Code 12 System normal
Code 13 Oxygen sensor fault
Code 14 Coolant temperature fault
Code 21 TPS signal fault
Code 23 MAT circuit fault
Code 24 Vehicle speed signal sensor fault
Code 32 EGR sensor fault
Code 23 MAP sensor fault
Code 42 Electronic spark timing fault
Code 43 Electronic spark control fault
Code 44 Oxygen sensor fault
Code 51 Prom error
Code 55 ECM fault

Notes:

Codes being displayed will differ from model to model. Sometimes, there are more codes than shown above. If not on the list, please check your service manual or contact ATS.

To prevent replacing unnecessary parts, do not replace any part until you verify the circuit or sensor or contact ATS for assistance.

Monday, April 17, 2006

Tip #8 Testing mass sensor codes

Mass sensor is one of the common sensors used to monitor air volume going to your engine. Almost all engines have this sensor if map sensor is not used. It is located normally inside the air ducting just before the air filter. When it fails which happens all the time, you will get these symptoms:

Hesitation
Stalling
Cutting Out
Check engine light showing in your dash but it might not show sometimes.

Most mass sensor is expensive and sometimes cost over $200 and it would be foolish just to replace it without testing. All you do is take it apart until the wire element is exposed and clean it with brake spray (never use carb spray which will damage the sensor) and cotton swab. Also, make sure not to touch the wire element with your fingers which are very delicate. Once assembled, take the vehicle for a spin and if the symptom disappears, it shows the mass sensor is defective. You can then replace the sensor with confidence later if the symptoms return.

Shown below is an example of mass sensor:


NOTES:

1.) To avoid removing the wrong part, please contact http://www.automotivetroubleshootingsecrets.com so proper wire colors of the mass sensor including its location can be shown to you.

2.) Make sure to reset or clear the codes after servicing the mass sensor.

3.) Always replace the air filter if the mass sensor is defective.

Sunday, April 16, 2006

Tip #7 Testing catalytic converter (CAT) codes

As mentioned before, oxygen sensor installed after the CAT is used to monitor the converter’s condition. Whenever the CAT is plugged or contaminated, the oxygen sensor will give a code which reflects its efficiency. If you get a code (like low efficiency) for this CAT oxygen sensor, here are the best strategies for repairs:

Check the oxygen sensor first. Check the sensor wiring connections for burns and proper contact. You can follow it up with probing the voltage readings. If you recall, the normal oxygen sensor upstream oscillates from 0.1 to 0.9 volt after the engine gets hot. However, the CAT oxygen sensor voltage reading variation is actually smaller between 0.4 to 0.7 volt or a difference of 0.3 volt. Also, if you monitor both upstream and downstream oxygen sensors from cold, the voltage reading will be almost the same but as soon as the engine gets hot, the variation starts to show up.

If the CAT oxygen sensor reading is stuck or non-existent, it probably shows the CAT is defective but you can start the repair by replacing the oxygen sensor first. If after replacing this sensor and condition remains the same, it’s time to change your CAT.

Shown below is an example of a CAT oxygen sensor:


Notes:

When replacing your CAT, try tapping the body with a rubber mallet. If there is noise inside, it shows the CAT has deteriorated.

Stay away from after market and cheap CAT unless you are prepared to do it again. (Always use the CAT from the dealer).

Saturday, April 15, 2006

Tip #6 Beware when buying used vehicle

Today, while passing by a garage, I looked at a vehicle being repaired in the last couple of days. I wondered because all the mechanic has to do was replaced the alternator. When
I asked about the hold up, he explained:

“We cannot just replace the alternator without asking authorization from the owner. The alternator itself was over $600 and the labour is about 3 hours and by the time we bill him for it, the owner will be charged about $1000”.

What??? Just for an alternator? I went and had a look at the engine compartment of the vehicle and this is what I saw (see picture below):


The vehicle is a 2002 model but warranty coverage was 100K but vehicle has already 200k so the dealer will not give warranty.

What is the lesson of the story? No matter how cheap the vehicle being offered to you, find out:

What is the cost of the fast moving parts like: alternator, starter, brake pads and shoes?

You should ask this because these are the parts that easily wear and will bite you later.

Friday, April 14, 2006

Lexus vehicles 1990-1995 obd1 codes retrieval

Lexus are the top end vehicles made by Toyota Corporation and getting the meaning of the check engine light codes is basically the same like most Toyota vehicles.

To get the codes yourself, turn the engine off and connect a jumper wire between terminals TE1 and E1 of the diagnostic terminal connector located in the engine compartment or under the left side of the dash. When you turn the key on (do not start engine), the check engine light lamp in your dash panel will start to flash the codes. Codes are usually shown in 2 digits numbers like code 24 is 2 flashes, a pause and 4 flashes. A pause of 2.5 seconds will follow the next code. When all codes are transmitted, the entire code will be flashed again after 4.5 seconds.

Clearing the codes is simple that is done by removing the fuse of the EFI from junction box 2 for 10 seconds. Make sure to remove the jumper wire and switch the key off before clearing the codes.

Here are some popular Lexus vehicles 1990-1995 codes:

Code 12 and Code 13 Rpm signal circuit fault
Code 14 Igniter signal circuit fault
Code 16 ECT control signal fault
Code 21 and Code 28 Main oxygen sensor fault (for ES300; SC300 & GS300 models)
Code 22 Coolant temperature circuit fault
Code 24 Intake temperature sensor circuit fault
Code 25 and Code 26 Air fuel ratio fault (for ES300 & SC300 models)
Code 27 Sub-oxygen sensor circuit fault (for ES300 CA & GS300 models)
Code 31 Low airflow meter voltage (for ES300 and GS300 models)
Code 32 High airflow meter voltage (for ES300 model)
Code 35 Barometric pressure sensor circuit fault (for GS300 & SC300 models)
Code 41 and Code 47 Throttle position sensor circuit fault
Code 42 Vehicle speed sensor circuit fault
Code 43 Starter signal
Code 51 Switch condition signal fault (for ES300; GS300 & SC300 models)
Code 52 Code 52 and Code 55 Knock sensor circuit fault
Code 71 EGR system circuit fault (for ES300; GS300 & SC300 models)
Code 78 Fuel pump control circuit fault (for GS300 & SC300 models)

Thursday, April 13, 2006

Infinity vehicles 1990-95 obd1 codes retrieval

Being the top end product of Nissan, Infinity check engine light codes can be accessed by checking the led light (red color) indicator in the computer box. This computer is usually located in the passenger side kick panel. To access the codes, simply put the computer box in test mode 2 by turning the diagnostic mode selector in the computer box fully clockwise. Wait 2 seconds and turn it fully counter clockwise. If you do this with key on, engine off, the led light in the computer box will start to flash.

Reading the codes should be easy where the long flashes indicate the first digit and then short flashes indicate the second digit. Example: code 32 is 3 long flashes followed by 2 short flashes. There is a pause of 0.9 second between flashes and 2.1 seconds between codes. Make sure to turn back the setting to fully counter clockwise after the test (mode 1). Also, do not turn this screw while engine is running.

Here are some popular malfunction codes for Infinity vehicles 1990-1995:

Code 11 Crankshaft position sensor fault
Code 12 Mass air flow sensor fault
Code 13 Engine coolant temperature sensor
Code 14 Vehicle speed sensor
Code 16 Traction control system
Code 21 Ignition signal circuit
Code 31 ECM fault
Code 32 EGR fault
Code 33 Oxygen sensor fault (left)
Code 34 Knock sensor
Code 35 EGR temperature sensor
Code 43 Throttle position sensor
Code 45 Injector leak
Code 46 Secondary throttle position sensor
Code 51 Injector circuit
Code 53 Oxygen sensor fault (right)
Code 55 No malfunction

Notes:

To clear the codes, disconnect battery negative terminal for 1 minute or turn the diagnostic selector to mode 1 from mode 2 by turning the screw fully counter clockwise.

Wednesday, April 12, 2006

Tip # 5 Fixing oxygen sensor codes

For older vehicles with oxygen sensor, this is use primarily to monitor the quality of the engine fuel mixture. It is done by checking the percentage of oxygen compared to the fuel when the mixture comes out of the exhaust. This is why they are placed in the exhaust manifolds where the combustion gas is passing.

If you get an oxygen sensor code, you can test it by measuring the voltage of the wire going to the sensor. It should be taken after the engine has warmed up (say about 20 minutes after starting) and the voltage reading in the wire should be fluctuating. Depending on the engine type, the reading should oscillate between a lower voltage and a higher voltage example: between 0.2 volt to 0.8 volt. Any reading showing the voltage stuck at low or high voltage indicates a problem.

Fixing check engine light with oxygen sensor codes should be a breeze if you this simple principle. Shown below is an example of an oxygen sensor.


You can actually simulates an oxygen sensor problem by making the engine deliberately rich by spraying fuel in the intake (like carb cleaner) and you should see the reading staying at a high voltage. The same thing happens if you deliberately make a vacuum leak by opening a vacuum hose which will make the mixture lean and the sensor showing a constant low voltage reading. On newer models coming out lately, 2 oxygen sensors are used: one for the engine and a second one located after the catalytic converter (CAT). The last one is use to monitor the CAT performance which we will discuss later.

Tuesday, April 11, 2006

Acura vehicles 1986-95 obd1 codes retrieval

There are a few different ways to retrieve the codes for “check engine light” for Acura vehicles. One method is to use a led light (sometimes 2 led lights) on the computer or controller box itself. If it has 2 led lights, the color is red and amber. The red is used for flashing the codes whereas the amber is used for adjustment. If you have only a single led light indicator, then that is used for flashing the code.

The controller box can be found by lifting the carpet of the passenger side front foot well or floorboard. You can see the led lights without removing the controller. On other models, you can find the controller under the driver or passenger front seat.

The second way to get the code is using a jumper wire on the diagnostic connector located on the kick panel at the front passenger side. You then watch the codes being flashed at the dash panel after you turn the key on. To read the code being flashed is easy. Example: Code 23 is 2 long flashes followed by 3 short flashes. A longer pause separates the next code that follows.

Here are Acura vehicles 1986-95 general codes:

Code 0 Electronic control unit (ecu)
Code 1 02 (oxygen) sensor
Code 3 and 5 map sensor
Code 4 Crank angle sensor
Code 6 Coolant temperature sensor
Code 7 Throttle angle sensor
Code 8 Crank angle sensor (TDC)
Code 9 Crank angle sensor (CLY)
Code 10 Intake air temperature sensor
Code 12 EGR system fault
Code 13 Atmospheric pressure sensor
Code 14 Electronic air control valve
Code 15 Ignition output signal
Code 16 Fuel injector fault
Code 17 Vehicle speed sensor
Code 21 Spool solenoid valve
Code 22 Valve timing oil pressure switch fault
Code 23 Knock sensor
Code 41 Oxygen sensor heater fault
Code 43 Fuel supply system

Notes:

You can reset or clear the codes by disconnecting the battery but the right way is to remove the fuse of a component depending on your model. Example, some vehicle uses the alternator sense fuse, hazard back up light fuse, clock fuse, etc. Refer to your manual or contact ATS.

There are more codes available on other different models, check your manual or contact http://www.automotivetroubleshootingsecrets.com.

Monday, April 10, 2006

Tip #4: How does BCM module works?

Generally speaking, there are 2 types of engine computers used in your vehicle: one for engine management (called ecm, ecu, pcm or eca) and a second one for the vehicle body that controls the dash panel and all the gages; security like alarm system which monitors all openings like doors and tailgates; audio and sound system; wipers and cruise system…in short almost all the functions of your vehicle except the engine!

Sometimes you will experience your dash gages not working accompanied by both radio and wipers quitting at the same time. What to do? Check your BCM.

Here are some quick checks you can do to test your BCM:

Find the location of the BCM module usually located under your dash panel depending on the vehicle type and model. http://www.automotivetroubleshootingsecrets.com can assist you in finding the correct location/wiring diagram for most vehicles up to 2003-2004 models).

Once you find the BCM, you can do the following:

Wiggle test the wiring terminals going to it while the problem is acting up. If there is a bad connection, you might find a change in the symptom.

Undo the ecm terminal to isolate the bcm (remember to remove the battery connection every time you touch the bcm or your ecm). Why isolate the ecm? Because if there is a short in the ecm (engine computer) circuit, it will affect the bcm too. Sometimes after you disconnect the ecm, the dash gages return which shows the problem was the ecm system.

Note:

If unplugging the ecm does not work, try unplugging each component of your BCM. Example: remove the radio plug-in, security alarm module plug-in, wiper module, door module, cruise control module etc (do the removal one at a time and watch your dash to see the effect). The last module you touched where the dash gages start to work is the culprit. If none of these work, try measuring the voltage as shown below.

Measure the BCM pin ground supply provided in the wiring diagram. Any measurement higher than 0.250 volt is a red flag which shows something is shorted in the circuit. Again these ground pins or connections are shown to you in a wiring diagram if you are a member of ATS.

Measure the bus pin terminal, they are usually shown as positive or negative bus connector. Unlike the ecm where you check the reference voltage at 5 volts, measure the bcm bus connector pin and you should get 2.4-2.5 volt for normal operation. If the reading is normal (2.4 to 2.5 volts), it shows the bcm is OK. You can then replace the instrument panel first. If after replacing the instrument panel and still the same problem exist, replace the bcm.

Note:

Before replacing the instrument panel, check with your dealer or ATS to confirm the programming of your odometer. On most models, the odometer program is located in the bcm not in the instrument panel. So if you are replacing the bcm, you have to remove the old one so you can take it to the dealer who will need it to program your new bcm.

Sunday, April 09, 2006

Hyundai vehicles 1989-1995 obd1 codes retrieval

To get your check engine light codes for Hyundai vehicles 1989-95 is simple. All it needs is your analog voltmeter (a voltmeter that has a needle indicator) hooked up to your diagnostic connector. The diagnostic connector is usually located under your dash panel on the left side of the steering column.

To hook up the voltmeter, connect the positive lead on the “mpi” diagnostic pin on the top right corner of the connector and the negative lead is connected to the ground pin of the diagnostic connector located in the lower left corner.

You can then turn the key on and watch the codes being sweep by the needle of your voltmeter. Example: A code 13 is shown as 1 sweep of long duration followed by 3 sweeps of short duration. Also if there are more codes, it will be shown in numerical order.

Here are some popular obd1 codes for Hyundai 1989-1995 vehicles:

Code 11 Oxygen sensor
Code 12 Air flow sensor
Code 13 Air temperature sensor
Code 14 Throttle positioner sensor
Code 15 Motor position sensor
Code 21 Engine coolant sensor
Code 22 Crank angle sensor
Code 23 No.1 cylinder top dead center sensor
Code 24 Vehicle speed sensor
Code 25 Barometric pressure sensor
Code 41 Injector
Code 42 Fuel pump
Code 43 EGR
Code 44 Ignition coil fault
Code 59 Oxygen sensor fault

Saturday, April 08, 2006

Mazda vehicles 1987-94 obd 1 codes retrieval

Most Mazda vehicles with check engine light illuminated can be retrieved by using the diagnostic connector located in the fender near the battery. All you need is ground the green connector or pin 1 terminal or TEN terminal (sometimes they call it FEN terminal) at the diagnostic connector. You can then turn the key on but do not start and watch the codes being flashed in your dash panel.

When counting the flashes, use this as a guide:

Code 23 is 2 long flashes followed by 3 short flashes. If there is a code that follows, there will be a pause in between.

Here are some popular Mazda codes for models 1988-94:

Code 01 Ignition pulse
Code 02 Ne signal or Ne 2 signal from distributor
Code 03 G1 or G signal from distributor
Code 04 G2 signal from distributor
Code 05 Knock sensor left side
Code 06 Speed signal
Code 07 Knock sensor right side
Code 08 Air flow meter
Code 09 Engine coolant temperature
Code 10 Intake air temperature
Code 11 Intake air thermo sensor
Code 13 Intake manifold pressure sensor
Code 14 Atmospheric pressure sensor
Code 15 Oxygen sensor
Code 16 EGR sensor
Code 17 Close loop system left side
Code 23 Heated oxygen sensor right side
Code 24 Close loop system right side
Code 25 Solenoid valve pressure regulator
Code 26 Solenoid valve purge control
Code 27 Solenoid valve purge control No.1 and 2
Code 28 Solenoid valve EGR vacuum
Code 29 Solenoid valve EGR vent
Code 30 Relay for cold start injector
Code 34 ISC valve or idle control valve
Code 36 or Code 40 Oxygen sensor heater relay or right side oxygen sensor heater
Code 37 Oxygen sensor heater or coolant fan relay
Code 41 and Code 46 Solenoid valve VRIS
Code 42 Solenoid valve Waste gate for turbo-charged engines
Code 65 A/C signal
Code 67 and Code 68 Coolant fan relay
Code 69 Engine coolant temperature sensor

Note:

Diagnostic connector location can vary for different models.

Friday, April 07, 2006

Nissan vehicles 1984-94 obd1 code retrieval

Nissan check engine light codes can be retrieved by accessing the engine computer usually located under the passenger seat, behind the glove box, center console or depending on the model. The computer itself stores the code and has a led light indicator in the box located in the top or side of the housing. The led light indicator could be single or double.

When activated, you have to either flick a switch or turn a screw in the computer box to start the led lights to flash after turning the key on but with engine not running.

Using a screw driver, turn the ignition key on and turn the screw driver fully clockwise and wait 2 seconds. Then turn the screw driver fully counter clockwise and the led light should start to flash in the computer box itself. When you have a single led light, you can read the code using this method:

Code 12 is showed by 1 long flashes followed by 2 short flashes

When you have a computer box with 2 led lights (usually a red and green light), the code can be read using this method: green led light will flash the first digit and the red led light will flash the second digit. Example: 3 flash of green and 4 flashes of red means a code 34.

Note: There are 5 different modes when accessing these codes and depending on the vehicle and model, please check with your dealer or ATS on what mode to use.

Here are some Nissan 1984-1995 popular common fault codes:

Code 11 Crank sensor angle
Code 12 Mass airflow sensor
Code 13 Engine coolant temperature sensor
Code 14 Vehicle speed sensor
Code 21 No ignition reference
Code 22 Fuel pump
Code 31 Engine control unit
Code 32 EGR sensor
Code 33 Oxygen sensor
Code 34 Knock sensor
Code 35 EGR temperature sensor
Code 43 Throttle positioner sensor
Code 45 Injector leak
Code 51 Injector circuit
Code 54 Automatic transmission signal
Code 55 No malfunction recorded

Thursday, April 06, 2006

Tip #3: Computer Quick Test

If you see your engine light in the dash panel and you suspect the computer is the problem by the following symptoms:

Too many codes being displayed
The check engine light will not show or flash when turning the key on
Codes coming up is non-existent or not in the list supplied

Here are quick ways to find the fix:

Tap your computer housing gently with your hand and watch the dash. If connections are loose, the codes might show up.

Check the ground wire connections to the ecm, they could be loose, corroded. You can also measure the ground voltage. It must not exceed 0.250 volt. Higher than this value means a short somewhere in the circuit or the ecm itself. Ground wires are usually black in color. Finally, you can add your own ground wire to the ecm housing if you suspect a poor ground connection.

If the computer only acts up when hot, heat it up with a hair dryer and make voltage reading and see if there are changes. If the ecm is only acting up when cold, remove it and throw it to your freezer and test again.

Finally, take it out (with battery disconnected) and physically check the printed circuit inside for burns, corrosion by moisture.

Shown below is an example of a Chrysler computer.


Note the plug in terminals where the ecm pins are connected.

Wednesday, April 05, 2006

Toyota 1990-1995 vehicles obd1 code retrieval

When the check engine light shows up in your 1990-95 Toyota vehicle, the quickest way to get the code is to access the diagnostic connector in the engine compartment ( usually sitting in the fender) or by the kick panel under the dash board in the passenger side. Connect a jumper wire between terminals TE1 and E1 terminals and by turning the key on, it will start flashing the codes in your dash. On Tercel and MR2, use the jumper wire between terminals T and E1 instead.

If there are no codes, the check engine light will flash 2 times per second CONSTANTLY with no patterns or pauses. If there are any codes, it will be shown in 2 digits codes. Example: code 24 is shown as 2 flashes, a pause followed by 4 flashes. If there are mode codes, the next one will transmitted after 2.5 seconds. (One some models, codes are displayed in one digit code only and the difference is the codes are displayed with 4.5 seconds delay between codes). When finished reading the codes, turn the key off and remove the jumper wire.

Shown below is an example of the location of the diagnostic connector.


Here are the common codes for Toyota vehicles 1988-95:

Code 11 Momentary interruption in power supply to ECU (electronic control unit or computer) up to 1991
Code 12 Engine revolution signal missing
Code 13 Rpm signal to ecu missing above 1000 rpm
Code 14 Igniter signal to ecu missing
Code 16 A/T control signal missing from ecu
Code 21 Main oxygen sensor signal fault
Code 22 Water temperature sensor circuit fault
Code 23 and 24 Intake air temperature signal fault
Code 25 Air/fuel ratio LEAN
Code 26 Air/fuel ratio RICH
Code 27 Sub-oxygen sensor signal or heater circuit fault
Code 28 No.2 oxygen sensor/heater signal fault
Code 31 and 32 Air flow meter circuit or Vacuum sensor signal fault
Code 34 and 36 Turbo-charging pressure signal fault
Code 35 Altitude compensation sensor signal fault
Code 41 Throttle position circuit fault
Code 42 Vehicle speed sensor circuit
Code 43 No starter signal to the ecu
Code 51 AC signal on; DL contact off (in trany shifter with diagnostic connector jumped)
Code 52, 53 and 55 Knock sensor fault
Code 71 EGR system malfunction
Code 72 Fuel cut solenoid signal fault
Code 78 Fuel pump control signal fault
Code 81, 83, 84 and 85 TCM communication fault

Tuesday, April 04, 2006

Honda 1990-1995 obd1 code retrieval

For most Honda vehicles between 1990-95 models, you can get the code yourself by using the diagnostic connector located in the passenger side kick panel. All you do is use a jumper wire in the 2 pin service connector. (There is a second connector with a 3 pin use for a scanner). You can then turn the key on and watch the code being flash in your dash panel check engine light indicator. On some models, a led light is used to flash the code instead and this led light indicator is located in the computer itself.

Shown below is the location of Honda diagnostic connector:


When counting the flashes, use 43 as a guide like 4 long flashes followed by 3 short flashes is code 43. Other code that follows is separated by a long pause.

Here are some common Honda OBD1 codes:

Code 0 and 11 Electronic Control Module (ECM)
Code1 Heated oxygen sensor A
Code 2 Oxygen content B
Code 3 and 5 Manifold Absolute Pressure
Code 4 Crank position sensor
Code 6 Engine coolant temperature
Code 7 Throttle position sensor
Code 8 Top dead center sensor
Code 9 No.1 cylinder position sensor
Code 10 Intake air temperature sensor
Code 12 Exhaust recirculation system
Code 13 Barometric pressure sensor
Code 14 Idle air control valve or bad ECM
Code 15 Ignition output signal
Code 16 Fuel Injector
Code 17 Vehicle speed sensor
Code 19 A/T lock-up control solenoid
Code 20 Electric load detector
Code 21 V-TEC control solenoid
Code 22 V-TEC pressure solenoid
Code 23 Knock sensor
Code 30 A/T FI signal A
Code 30 A/T FI signal B
Code 41 Heated oxygen sensor heater
Code 43 Fuel supply system
Code 45 Fuel supply metering
Code 48 Heated oxygen sensor
Code 61 Front heated oxygen sensor
Code 63 Rear heated oxygen sensor
Code 65 Rear heated oxygen sensor heater
Code 67 Catalytic converter system
Code 70 Automatic transaxle
Code 71 Misfire detected cylinder 1
Code 72 Misfire detected cylinder 2
Code 73 Misfire detected cylinder 3
Code 74 Misfire detected cylinder 4
Code 75 Misfire detected cylinder 5
Code 76 Misfire detected cylinder 6
Code 80 Exhaust recirculation system
Code 86 Coolant temperature
Code 92 Evaporative emission control system

If you need assistance in fixing your check engine light "Honda obd1 codes", please contact ATS.

Monday, April 03, 2006

Tip # 2 GM obd1 code 42

For some of you, who owns a GM vehicle and getting the check engine light in your dash, please read carefully below. (For GM vehicles made before 1995 that has a distributor type ignition and has code 42-EST circuit failure and has the following symptoms:

Stalling at stop signs
No start but if you wait up to 2 hours, it will start again

TESTS:

1.) Please confirm the code first by resetting the code and see if the code will show up again a second time. If it does, it means this code is really a hard code that must be fixed.
During no start, confirm the presence of ignition problem by checking the presence of spark using an especial tool (cost under $5) recommended by http://www.automotivetroubleshootingsecrets.com.
2.)Make sure there is 12 volts supply going to your distributor when you turn the key on.

FIX:

Remove the distributor assembly and replace the following:

Pick up coil
Ignition module

Once the above parts are replaced, reset the code and go for a quick road test to confirm.
If your engine does not have a distributor, replace the crank sensor instead of the pick up coil. But check also for input voltage to the crank sensor circuit.

Sunday, April 02, 2006

Chrysler 1985-95 OBD1 code self-retrieval

To fix the check engine light on Chrysler’s vehicles made before 1995, you can get any engine fault code by just using your ignition key. You can then watch the codes being flashed in the dash.

Shown below is the only tool you need to get your code:


Within a period of 5 seconds, cycle the ignition keyON-OFF-ON-OFF-ON.

Count the number of time the MIL (check engine lamp)on the instrument panel flashes on and off. The number of flashes represents the trouble code. There is a short pause between the flashes representing the 1st and 2nd digits of the code. Longer pauses are used to separateindividual 2-digit trouble code.

An example of a flashed DTC is as follows:

-Lamp flashes 4 times, pauses, then flashes 6 more times. This denotes a DTC number 46.
-Lamp flashes 5 times, pauses, then flashes 5 more times. This indicates a DTC number 55. DTC 55 will always be the last code to be displayed.

Chrysler products common CODES OBD1 (domestic vehicles made before 1995)

88 display used for start or test
11 camshaft signal or ignition signal, no reference signal during cranking
12 memory to controller has been cleared within 50-100 engine starts
13 map sensor not detecting any change during test
14 map voltage too high or too low
15 vehicle speed sensor, no signal detected
16 knock sensor circuit. open or short detected
17 low engine temperature, possible thermostat fault
21 oxygen sensor signal, neither rich or lean detected
22 coolant sensor voltage low
23 air charge voltage high/low detected
24 throttle positioner sensor voltage high/low
25 automatic idle speed motor driver circuit, short or open detected
26 injectors 1,2,3 peak current not reached
27 injector control circuit does not respond to control signal
31 purge solenoid circuit, open or short detected
32 egr solenoid circuit, open or short detected
33 a/c clutch relay circuit, open or short detected
34 speed control servo solenoid, open or short detected
35 radiator fan control relay circuit, open or short detected
36 wastegate solenoid, open or short detected37 part throttle unlock(PTU) circuit, open or short detected
41 charging system circuit not responding to control signal
42 fuel pump or auto shutdown (ASD) relay voltage sensed at controller
43 ignition control circuit not responding
44 battery temperature voltage circuit problem
45 turbo boost limit exceeded-map sensor detects overboost
46 battery voltage too high
47 battery voltage too low
51 air/fuel at limit
52 logic module fault
53 internal controller failure
54 camshaft reference circuit not detected
55 end of message
61 baro read solenoid, open or short detected
62 emr mileage not stored
63 eeprom write denied
64 flex fuel sensor signal out of range
65 manifold tuning valve, open or short detected
66 no ccd messages
76 ballast bypass relay, open or short detected
77 speed control relay, open or short detected

Notes:

The above codes must be verified before replacing any parts. Contact ATS and we will give you the tests and fixes for the code.

Saturday, April 01, 2006

Ford 1985-95 OBD1 code self-retrieval

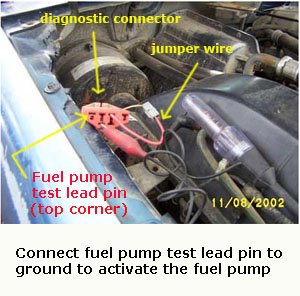
When checking engine service light on Ford vehicles made before 1995, you can get the code yourself using a $5 tool called "test light". All you need is to hook it up to the vehicle’s diagnostic connector and turn your key on and watch the codes being flashed in your dash panel.

Here's how the connector is set up below:


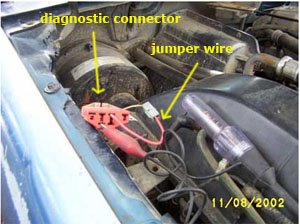
You should find the diagnostic connector under your hood normally by the fender on the battery side. By just using your test light and a jumper wire, it will tell you what kind of problem you got.

KEY ON ENGINE OFF (KOEO) TEST

1. Make sure engine is fully warmed. If in doubt, run engine at 2000 rpm for 2 minutes.
2. Turn ignition off and wait 10 seconds for system to shut off. Make sure A/C is off and transmission is in Park (automatic) or Neutral (manual).
3. Hook up light and jumper (or a tester if you have one). Turn key to ON (do not start engine). Read the codes.

How to do it?

Example code 23: your test light should flash 2 long consecutive flashes followed by 3 short pulses.

Ford's common codes for OBD1 (vehicles made before 1995)

11 system pass
12 idle control fault
13 dc motor did not move
14 engine rpm signal fault or PIP circuit failure
15 eec processor or power to KAM interrupted
16 rpm to low to check oxygen sensor test or fuel control error
17 cfi fuel control system fault or rich/lean condition indicated
18 ignition diagnostic monitor (IDM) circuit failure
19 cylinder identification (CID) sensor input failure
21 engine coolant temperature (ECT) out of self-test range
22 manifold absolute pressure (MAP) sensor circuit out of range
23 throttle positioner sensor out of self-test range
24 air charge temperature (ACT) sensor out of self-test range
25 knock not sensed during dynamic response test
26 transmission fluid temperature out of self-test range
28 loss of primary tach, right side
29 insufficient input from vehicle speed sensor
31 egr positioner sensor below minimum voltage
32 egr positioner sensor below closed limit
33 throttle positioner sensor noisy/harsh on line
34 egr valve circuit out of self-test range
35 egr valve circuit above maximum voltage
38 idle track switch circuit open
39 axod torque converter or bypass clutch not applying properly
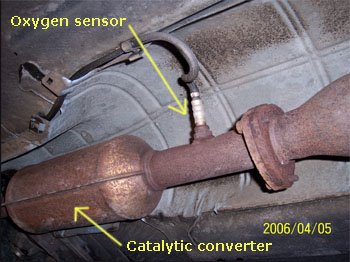
41 oxygen sensor circuit indicates system always lean
42 oxygen sensor circuit indicates system always rich
43 oxygen sensor out of self-test range
44 air injection control system failure
45 coil 1 primary circuit failure
46 coil primary circuit failure
47 4X4 switch is closed or oxygen sensor failure
48 coil primary circuit failure
49 electronic transmission shift error
51 engine coolant temperature sensor circuit open
52 power steering pressure switch circuit open
53 throttle position circuit above maximum voltage
54 air charge temperature circuit open
55 key power input to processor open circuit
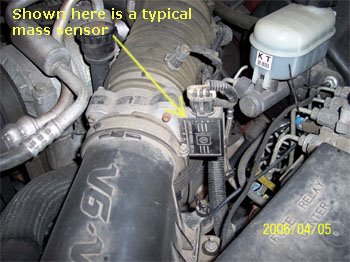
56 mass air flow circuit above maximum voltage
57 axod circuit failure
58 idle tracking switch circuit fault
59 automatic transmission shift error
61 engine coolant temperature circuit grounded
62 converter clutch error
63 throttle positioner circuit below minimum voltage
64 air charge temperature circuit grounded
65 charging system over voltage
66 mass air flow sensor circuit below minimum voltage
67 neutral/drive switch circuit open
68 transmission fluid temperature over temperature range
69 transmission shift error
70 data circuit communication link circuit failure
71 message center circuit circuit failure
72 insufficient manifold absolute pressure (MAP) change during dynamic response test
73 insufficient throttle positioner (TPS) change during dynamic response test
74 brake on/off (BOO) circuit open
75 brake on/off (BOO) circuit closed
76 insufficient air flow output change during test
77 brief wide open throttle not sensed during test
78 power interrupt detected
79 a/c on/defrost on during self test
81 map has not changed normally
82 super charger bypass circuit failure
83 OIC-low speed fuel pump relay circuit failure
84 egr vacuum regulator (EVR) circuit failure
85 canister purge circuit failure
86 shift solenoid circuit failure
87 fuel pump circuit failure
88 electro drive fan circuit failure
89 transmission solenoid circuit failure
91 no oxygen sensor switching detected
92 shift solenoid circuit failure
93 throttle positioner sensor input low
94 torque converter clutch solenoid circuit failure
95 fuel pump secondary circuit failure
96 fuel pump secondary circuit failure
97 transmission indicator circuit failure
98 electronic pressure control circuit failure
99 eec has not learned to control idle

Note:

The above codes must be verified before replacing any parts. Contact ATS and we will give you the test and fixes for the code.